Hyundai N Line 3D Trunk Emblem: Fit, Finish & Install
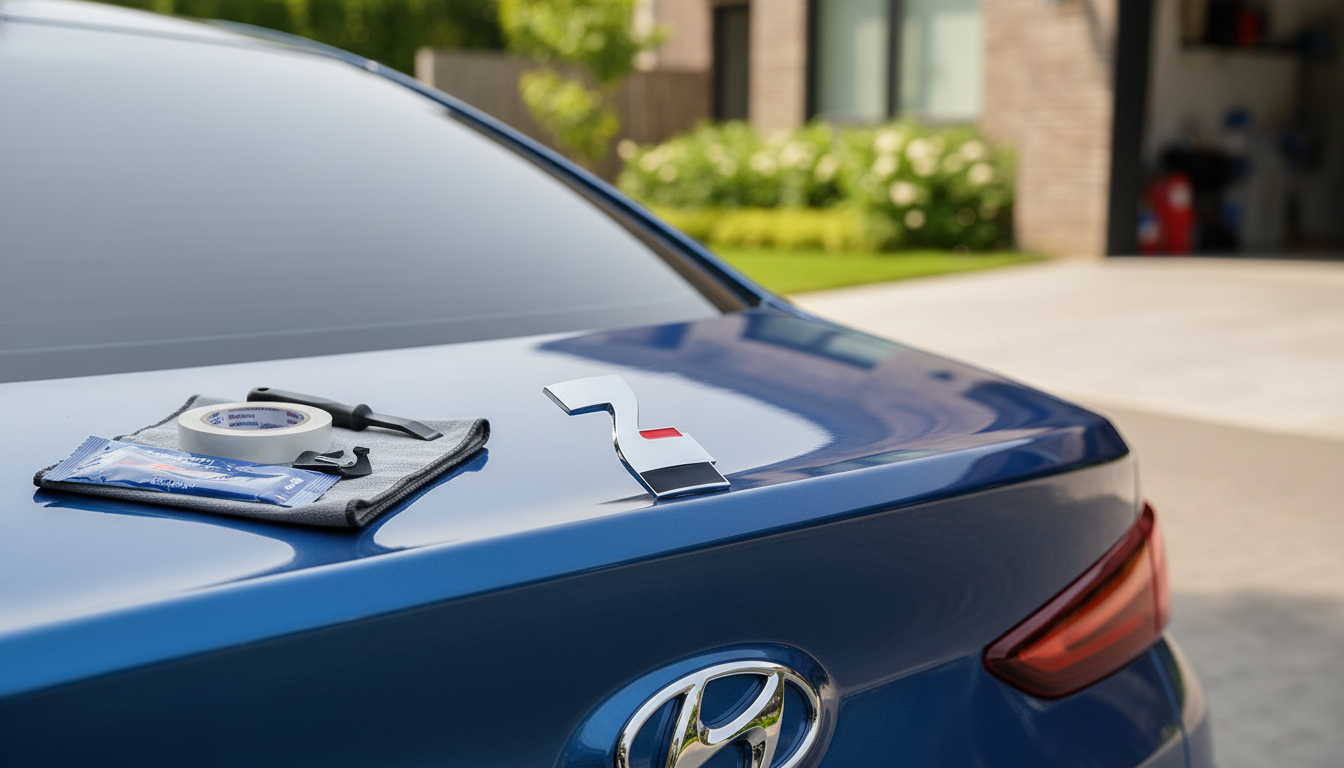
3D Metal N Line Rear Trunk Emblem Badge for Hyundai: Fit, Finish, and Easy Install
A small exterior upgrade can change the whole look of the rear end. This 3D metal N Line-style trunk emblem is designed to add a clean, sporty accent with a simple peel-and-stick install on compatible Hyundai models, while keeping the finish looking sharp through daily driving and weather. It’s the kind of detail that looks intentional from a few steps back—without committing to permanent modifications.
What This Rear Trunk Emblem Adds to the Look
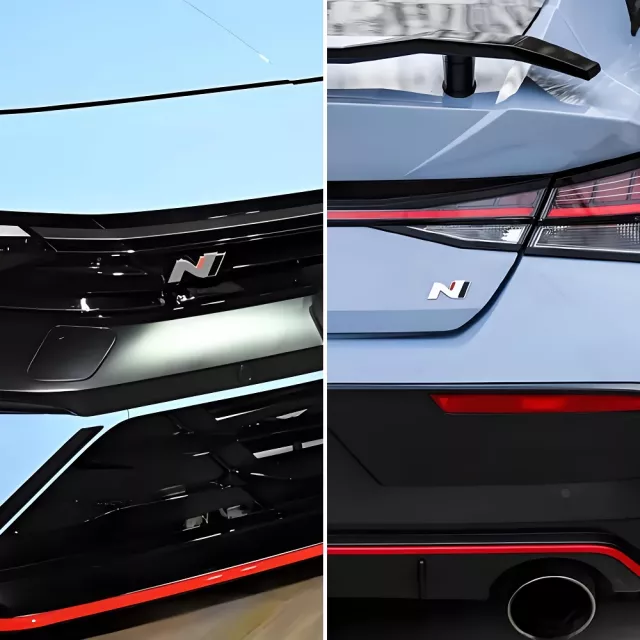
If the back of your Hyundai feels a little “empty,” a compact trunk emblem can bring the design together—especially if you already have N Line-inspired accents like dark trim, sporty wheels, or a rear diffuser.
- 3D raised metal styling that stands out more than flat stickers
- A subtle performance vibe that complements N Line-themed exterior details
- A quick refresh for a plain trunk lid or tailgate area
- Clean, minimal change without drilling, holes, or permanent alterations
Because it’s a small badge, alignment and placement make a big difference. A few extra minutes planning the position usually pays off with a more factory-like appearance.
Vehicle Compatibility and Placement Tips
This style of emblem is commonly used on Hyundai i20, i30, Sonata, Kona, Elantra, and Tucson/Tuson listings. Since trunk and tailgate shapes vary by year and trim, it’s smart to verify your exact surface and available space before applying.
- Choose a flat, smooth area so the adhesive can fully contact the paint.
- Avoid placing the badge over body creases, heavy curvature, rubber trim edges, or textured plastic.
- Check clearance from a rear wiper sweep (if equipped), trunk release buttons, and existing OEM badges.
- Stand behind the vehicle and confirm the emblem looks centered and level from normal viewing distance.
| Check | What to look for | Why it matters |
|---|---|---|
| Surface type | Gloss paint or smooth clear-coated area | Ensures full tape contact and long-lasting hold |
| Curvature | Mostly flat with minimal bend | Prevents edges lifting over time |
| Available space | Enough room around existing badging | Avoids visual crowding and misalignment |
| Temperature | Mild/warm installation conditions | Helps pressure-sensitive adhesive bond properly |
Materials, Finish, and Durability Expectations
A 3D metal emblem tends to look more premium than a printed decal, especially in direct light. The dimensional profile creates natural highlights and shadows that give the rear end extra depth without being flashy.
- Metal construction with a raised (3D) profile for a more upscale finish
- Built to handle typical outdoor exposure like sun, light rain, and road dust when installed on a properly cleaned surface
- Hand washing is the safest option around badge edges; avoid aggressive brushes directly on the emblem
- If using a pressure washer, keep distance and avoid aiming directly at the emblem edges to reduce lifting risk
Most peel-and-stick automotive emblems rely on pressure-sensitive attachment tape. For general information about automotive-grade attachment tape and proper bonding, see 3M’s automotive attachment tape guidance. For broader car wash best practices that help protect exterior details, the International Carwash Association is a helpful reference.
Installation: Clean, Align, Press, and Let It Set
The difference between “stuck on” and “installed” is prep work. Spend a few minutes getting the surface squeaky clean and using a guide line so the emblem sits straight.
- Wash the area and fully dry; remove wax, oils, and residue with isopropyl alcohol on a microfiber cloth.
- Test placement with painter’s tape to create a straight guide line and confirm centered alignment.
- Peel the backing gradually; avoid touching the adhesive with fingers.
- Press firmly across the entire emblem for 30–60 seconds, focusing on edges.
- Allow adhesive to cure: avoid washing or heavy rain exposure for about 24 hours when possible.
| Step | Tool/Item | Goal |
|---|---|---|
| Degrease | Isopropyl alcohol + microfiber | Maximize adhesion |
| Dry fit | Painter’s tape | Straight, centered placement |
| Apply | Clean hands, steady pressure | No bubbles, full contact |
| Set | Time (no wash ~24h) | Stronger long-term bond |
Removal and Repositioning (Without Damaging Paint)
Most adhesive-backed emblems can be removed later with patience and the right technique. The goal is to soften the adhesive, peel slowly, and avoid anything that scratches clear coat.
- If repositioning is needed immediately, lift gently and reapply before the adhesive fully sets (results vary by surface and tape type).
- For later removal, warm the emblem with a hair dryer to soften adhesive, then slowly peel.
- Remove leftover adhesive with an automotive-safe adhesive remover; finish with a wash and a light polish if needed.
- Avoid metal scrapers or harsh solvents that can mar paint or dull clear coat.
Product Options Available Now
If you want a subtle rear styling change without tools, this emblem is a straightforward, budget-friendly upgrade. For an extra interior accent that pairs nicely with a refreshed exterior look, consider adding a small cabin detail as well.
- 3D Metal N Line Logo Rear Trunk Emblem Badge Decals for Hyundai i20 i30 Sonata Kona Elantra Tuson — $3.51
- Crystal Moon & Star Car Vent Clips — $10.51
FAQ
Will this emblem stick securely to any surface?
Best results are on clean, smooth painted surfaces. Textured plastic, rubber trim, or heavily curved areas can reduce contact and increase the chance of edge lifting over time.
How long should the adhesive cure before washing the car?
Aim for about 24 hours without washing so the adhesive can set. After that, avoid blasting the emblem edges with high-pressure water, especially at close range.
Can it be removed later without harming paint?
Typically yes—warm the emblem to soften the adhesive, peel slowly, and remove residue with an automotive-safe adhesive remover. Avoid scraping tools that can scratch clear coat.


Leave a comment